Collecting bookmarks with Raycast
Creating a Raycast Extension to collect bookmarks in a structured way
Planted November 22, 2023
I have been trying to find ways to share the things I’m reading in a helpful way. I also know that not everything I read and want to share deserves a whole blogpost.
I’ve used lots of different tools over the years but in a move to own my data I’ve been trying to find a way to collect bookmarks myself and then share them on my site.
I’ve been using Raycast for a while now and I love it. It’s a great way to quickly access all the tools I use on a daily basis. I’m going to explain how I created a Raycast extension to collect bookmarks in the form and place I need it.
Before we start, do you:
- Raycast is installed
- You have a Raycast account
- Read and understand some TypeScript
Awesome! Let's go!
TLDR
I’ve created a Raycast extension to collect bookmarks. You can find the code here and the formatted output here.
This tutorial is pretty long. I want to break it up more to make it more readable and will embed a video version here soon.
Creating a Raycast Extension
Raycast extensions are written in TypeScript and are run in a Node environment. You can find the documentation here.
With Raycast installed you can run the command create extension. This will run you through a wizard to create a new extension.

I’m created a new extension called Bookmark Gatherer and I’m used the Form template.
Open the project
Find the folder you initialised the project in. Now, run:
npm installnpm run devThis will install all the dependencies and start the development server. You can run your command through Raycast already and see the logs in the terminal.
All of the work we are going to do is in the index.tsx file. This is the entry point for the extension.
Opening it up, we’ll see that it is a React component. We can use all the React goodness we want to create our extension.
The full file can be found here.
Setup and Dependencies
import { Form, ActionPanel, Action, showToast, Clipboard, getPreferenceValues, closeMainWindow, popToRoot } from "@raycast/api";import { useEffect, useState, useRef } from "react";import axios from "axios"import { load } from "cheerio";import fs from "node:fs"import path from "node:path"The first section of the file contains the import statements. These are used to import the necessary modules and libraries for the component. Let’s go through each import statement and explain its purpose.
Form,ActionPanel,Action,showToast,Clipboard,getPreferenceValues,closeMainWindow,popToRoot: These are all imported from the@raycast/apimodule. They are used to create the form and handle form submission. TheshowToastfunction is used to display error messages.useEffect,useState,useRef: These are imported from thereactmodule. They are used to create state variables and effect hooks. We’ll discuss these in more detail later.axiosandcheerioare used to get the page content from the bookmark and extract the title.fsandpathare used to save the bookmark data to a file.
I tried to implement this using just Node core modules but it made the code a bit too messy. Using these two libraries makes it much easier to get the data we need. You will need to install them though:
npm install cheerio axiosComponent Structure
We can now look at the component structure. The component is a functional component, which means it is a function that returns JSX. The component is called Command and it takes no arguments. The component is exported as the default export of the file.
export default function Command() {}At the top of the component we define the state variables. These are used to store the data from the form. We have a state variable for the URL, title, loading state, and custom tags.
We initialise the URL, the customTags and title to empty strings. We initialise the loading state to true.
React returns an array that we destructure into the state variables getter and setter.
const [url, setUrl] = useState("");const [title, setTitle] = useState("");const [isLoading, setIsLoading] = useState(true);const [customTags, setCustomTags] = useState("");Next, we define the descriptionRef ref. A ref is a way to access a DOM element in React. We’ll use this to focus on the description field once the loading is complete.
const descriptionRef = useRef(null);The form
Let’s look at the form itself. The form is wrapped in a Form component. The Form component takes a actions prop, which is a JSX element. This is used to render the actions at the bottom of the form. We’re only going to have one action, which is the submit button.
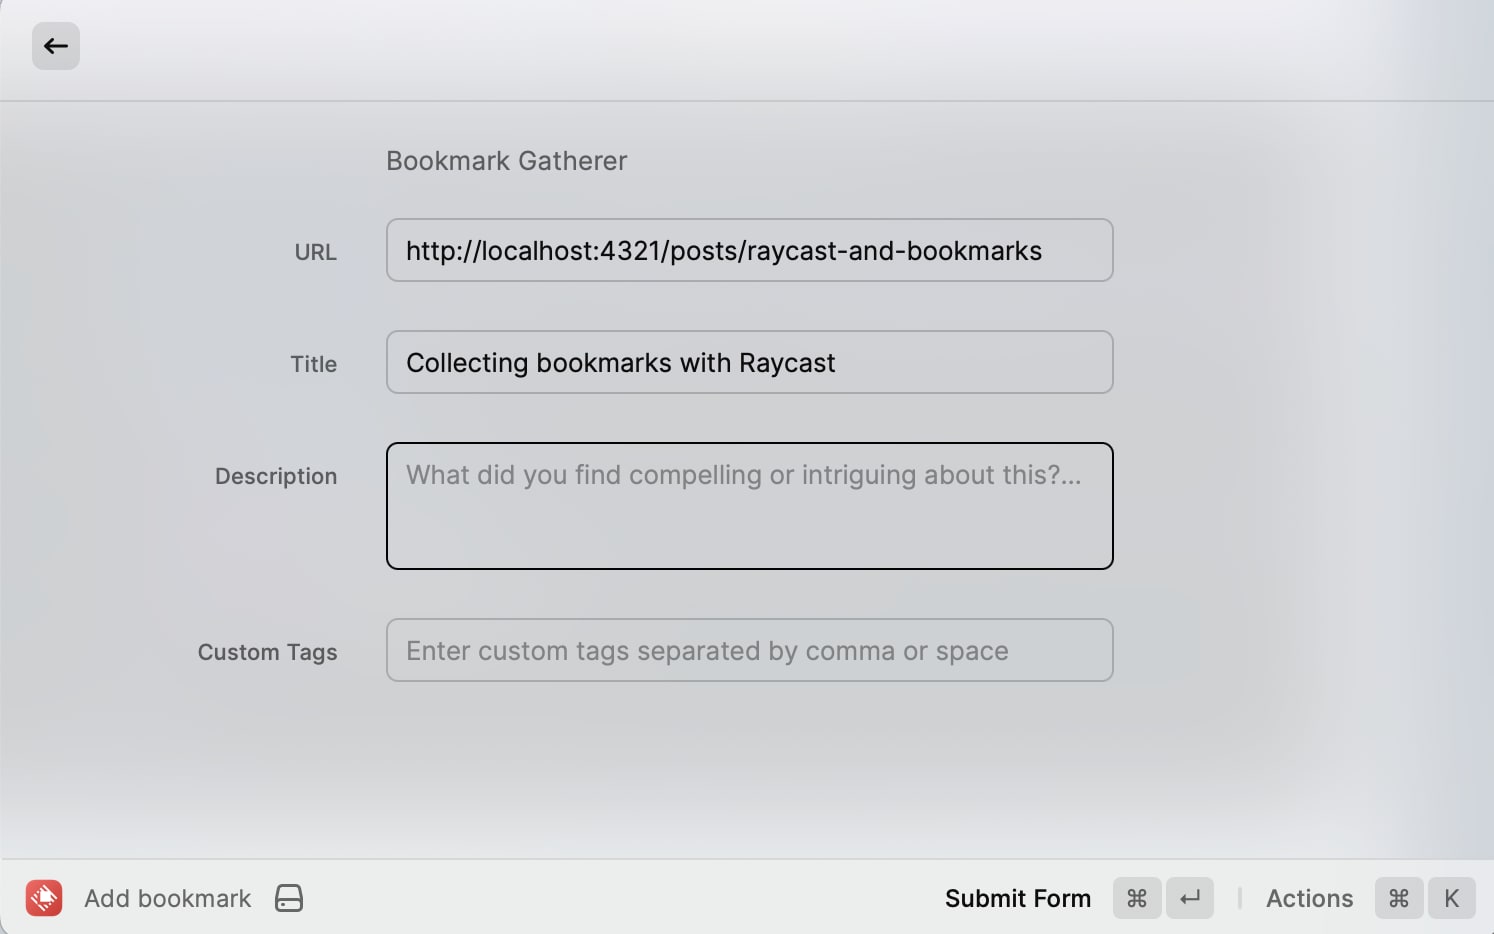
return ( <Form isLoading={isLoading} actions={ <ActionPanel> <Action.SubmitForm onSubmit={handleSubmit} /> </ActionPanel> } initialFocus="description" > <Form.Description text="Bookmark Gatherer" /> <Form.TextField id="url" title="URL" placeholder="URL" value={url} onChange={setUrl} /> <Form.TextField id="title" title="Title" placeholder="Title" value={title} onChange={setTitle} /> <Form.TextArea id="description" title="Description" placeholder="What did you find compelling or intriguing about this?" ref={descriptionRef} /> <Form.TextField id="customTags" title="Custom Tags" placeholder="Enter custom tags separated by comma or space" value={customTags} onChange={setCustomTags} /> </Form>);We are using the Form.Description component to display the title of the form. This is a simple text component that takes a text prop.
Next, we have two Form.TextField components. These are used to collect the URL and title. Each component takes an id, title, placeholder, value, and onChange prop. The id is used to identify the field. The title is used to display the title of the field. The placeholder is used to display placeholder text in the field. The value is used to set the value of the field. The onChange is used to set the value of the field when it changes.
The Form.TextArea component is used to collect the description. It takes the same props as the Form.TextField component. We also pass the descriptionRef ref to the ref prop. This is used to focus on the description field once the loading is complete.
The last Form.TextField component is used to collect custom tags. It takes the same props as the other Form.TextField components.
The action panel is rendered at the bottom of the form. It contains the submit button. The Action.SubmitForm component is used to render the submit button. It takes an onSubmit prop, which is a function that is called when the form is submitted.
The handleSubmit function
function handleSubmit(values: Values) { if (!values.url) { return } try { const tagsArray = values.customTags!.split(/,|\s+/).filter(tag => tag.trim() !== "") delete values.customTags; saveDataToFile({ ...values, tags: tagsArray, date: new Date() }); popToRoot() closeMainWindow({ clearRootSearch: true }); } catch (error) { console.log(error) showToast({ title: 'Error', message: 'Something went wrong' }); }}The handleSubmit function is called when the form is submitted. It takes a values argument, which is an object containing the values from the form. The function first checks if the URL is empty. If it is, it returns and does nothing.
Next, the function splits the customTags value into an array. It then deletes the customTags property from the values object. This is because the customTags field is not part of the bookmark data.
The function then calls the saveDataToFile function, passing in the values object. It then calls the popToRoot function, which closes the form and returns to the main window. Finally, it calls the closeMainWindow function, which closes the main window.
The saveDataToFile function
function saveDataToFile(data) {  const preferences = getPreferenceValues();  const saveDirectory = preferences.saveDirectory || process.env.HOME; // Fallback to home directory
  const filePath = path.join(saveDirectory, 'raycast-bookmarks.json'); // Save file in home directory  fs.readFile(filePath, (err, fileData) => {    let bookmarks = [];    if (!err) {      bookmarks = JSON.parse(fileData.toString());    }    bookmarks.push(data);    fs.writeFile(filePath, JSON.stringify(bookmarks, null, 2), (writeErr) => {      if (writeErr) {        showToast({ title: 'Error', message: 'Failed to save data' });      }    });  });}
The saveDataToFile function is used to save the bookmark data to a file. It takes a data argument, which is the bookmark data. The function first gets the preferences using the getPreferenceValues function. It then gets the saveDirectory from the preferences. If the saveDirectory is not set, it falls back to the home directory.
Next, the function creates the file path using the path.join function. It then reads the file using the fs.readFile function. If there is an error, it sets the bookmarks variable to an empty array. If there is no error, it parses the file data and sets the bookmarks variable to the parsed data.
The function then pushes the data argument to the bookmarks array. It then writes the bookmarks array to the file using the fs.writeFile function. If there is an error, it displays an error message using the showToast function.
fetchTitle
const fetchTitle = async (url: string) => { try { const { data } = await axios.get(url); const $ = load(data); const title = $('head title').text(); setTitle(title); } catch (error) { showToast({ title: "Error", message: "Could not fetch the website title" }); } };The fetchTitle function is used to fetch the title of the bookmark. It takes a url argument, which is the URL of the bookmark. The function first tries to fetch the data from the URL using the axios.get function. It then loads the data using the load function from the cheerio library. It then uses the text function to get the title from the data. Finally, it sets the title using the setTitle function.
If there is an error, it displays an error message using the showToast function.
useEffect to fill field from the clipboard
useEffect(() => { Clipboard.readText().then((clipboardText) => { if (clipboardText && clipboardText.startsWith("http")) { setUrl(clipboardText); fetchTitle(clipboardText); } setIsLoading(false); });}, []);The useEffect hook is used to fill the URL and title fields from the clipboard. It takes a function as the first argument and an array as the second argument. The function is called when the component is mounted. The array is used to specify the dependencies of the effect. If the array is empty, the effect is only called when the component is mounted.
The function first calls the Clipboard.readText function to read the clipboard text. It then checks if the clipboard text is not empty and starts with http. If it is, it sets the URL using the setUrl function. It then calls the fetchTitle function, passing in the clipboard text.
The function then sets the loading state to false using the setIsLoading function.
useEffect for the url changing
useEffect(() => { if (url) { fetchTitle(url); }}, [url]);The useEffect hook is used to fetch the title when the URL changes. It takes a function as the first argument and an array as the second argument. The function is called when the URL changes. The array is used to specify the dependencies of the effect. If the array contains the URL, the effect is called when the URL changes.
The function first checks if the URL is not empty. If it is not empty, it calls the fetchTitle function, passing in the URL.
useEffect for the loading state
useEffect(() => { if (!isLoading) { (descriptionRef.current)?.focus(); }}, [isLoading]);This useEffect hook is used to focus on the description field when the loading state changes. It takes a function as the first argument and an array as the second argument. The function is called when the loading state changes. The array is used to specify the dependencies of the effect. If the array contains the loading state, the effect is called when the loading state changes.
The function first checks if the loading state is false. If it is, it calls the focus function on the descriptionRef ref.
Allow the user to set a save directory
To allow the user to set a save directory, we need to add a preference to the package.json file.
"preferences": [ { "name": "saveDirectory", "title": "Save Directory", "type": "textfield", "description": "In which directory should the bookmarks be saved?", "required": true } ]By adding this preference, the user will be able to set a save directory in the preferences of the extension. The required property is set to true, which means the user will have to set a save directory before they can use the extension.
Conclusion
This tutorial has covered the basics of creating a Raycast extension. We’ve covered the basics of creating a form, handling form submission, and saving data to a file. We’ve also covered how to use the useEffect hook to fetch data from the clipboard and focus on the description field when the loading state changes.
You can see the results of formatted output of this on my bookmarks page.
I’ll talk about the Astro component I used to display the bookmarks in a future post.


