Modelling a new-born baby with XState and Vue
Planted July 08, 2021
I got to hang out with my friend Colby this week on his stream, Colbyashi Maru (non-Star Trek fans might miss the reference to the Kobayashi Maru). The idea of this stream is that developers try to solve an impossible problem in an hour while chatting to Colby.
Colby is soon to welcome his first son into the world and I was thinking about how I could use this as an opportunity to share any useful advice from my past 9 years of parenting. We went back and forth about some ideas but landed on trying to make a Baby Tamagotchi (here’s the result if you can’t wait to play with it).
Babies and state machines
When new humans first arrive into the world there are a limited number of states that they tend to be in. Our first task then was to make a list of some of these states (your list might vary):
- sleeping
- hungry
- fulldiaper
- tired
- happy
- crying
There are other states but I only had an hour, get off my back! :) With my list of finite states, I needed now to think about the events that would trigger a move from one state to another. This is where the XState Visualiser came in!

A screenshot of the XState Visualiser (click the image to visit)
When you first arrive on this page, you are treated to the machine for fetch. It shows the states and the ways to move between them.
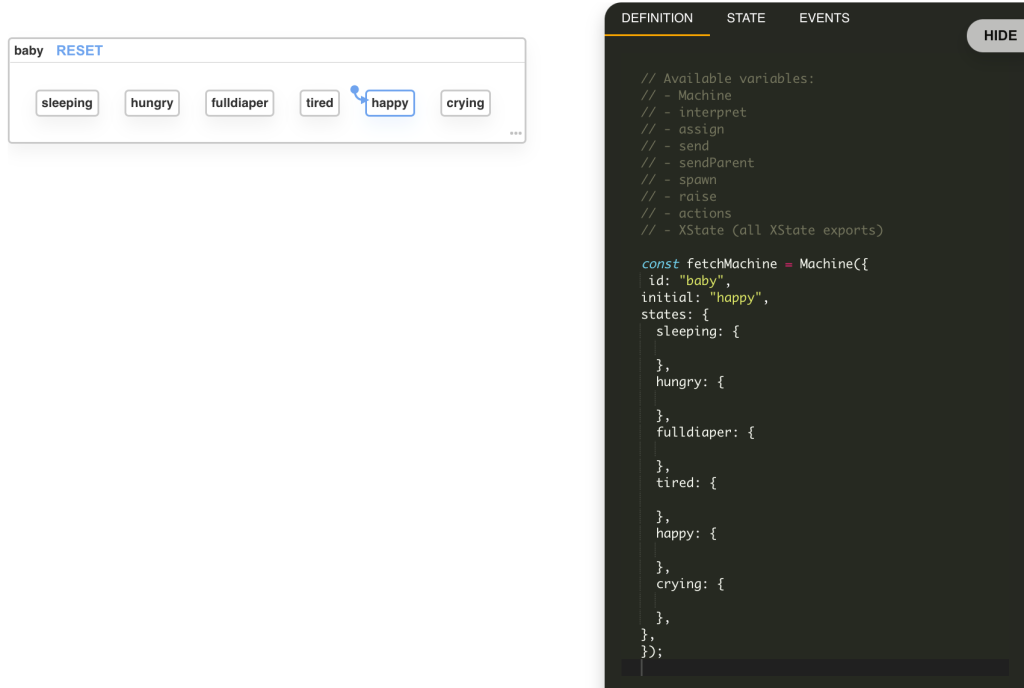
Visualiser with the states in place
We needed to add our baby states into the machine and set the initial state. Our baby starts in a happy state. The object that we are creating on the right can be used with XState in any JS adaptation of the library - vanilla JS, React, Vue, etc. I find this visual way of working really helpful.
Next we needed to add in how you move from one state to another. Since we started with the happy state we started there.
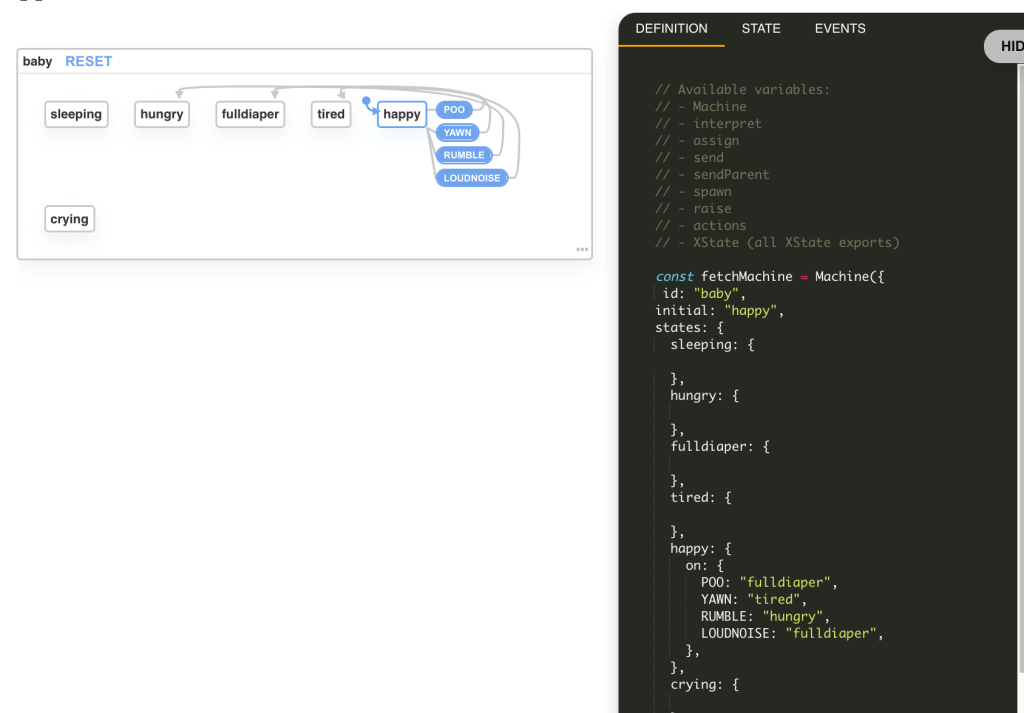
In the visualiser, the blue border of the state value shows the current state - you can then click on any of the blue events to trigger the corresponding events. We had some amusing banter about what might happen with a LOUDNOISE event and Colby went for fulldiaper. Ha!
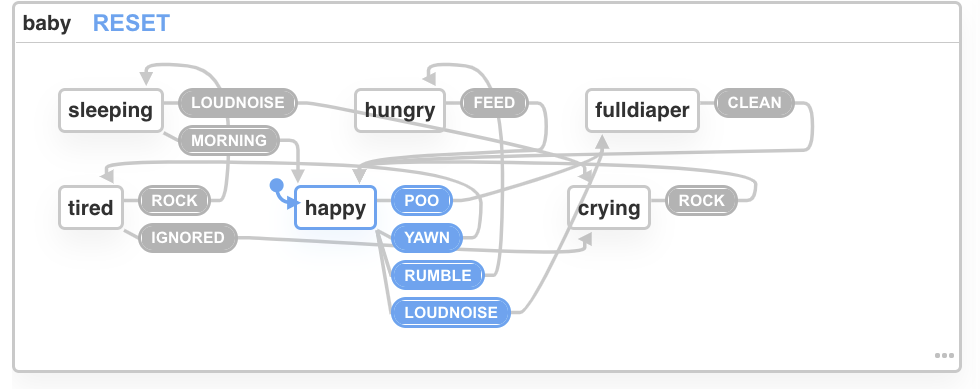
After that, it’s a case of mapping between each of the states and deciding on the various transition events. Up to this point, we’re totally framework agnostic. We built the actually tamagotchi in Vue 3, so I’m going to dig in a bit there.
@xstate/vue
I spun up a new Vue 3 project using the CLI and installed xstate and @xstate/vue. Next, I created a machine with the object we’d built in the visualiser:
import { createMachine } from "xstate";
const babyMachine = createMachine({  id: "baby",  initial: "happy",  states: {    sleeping: {      on: {        LOUDNOISE: "crying",        MORNING: "happy",      },    },    hungry: {      on: {        FEED: "happy",      },    },    fulldiaper: {      on: {        CLEAN: "happy",      },    },    tired: {      on: {        ROCK: "sleeping",        IGNORED: "crying",      },    },    happy: {      on: {        POO: "fulldiaper",        YAWN: "tired",        RUMBLE: "hungry",        LOUDNOISE: "fulldiaper",      },    },    crying: {      on: {        ROCK: "happy",      },    },  },});
and then used the composition API to use the machine.
import { useMachine } from "@xstate/vue"
export default {  name: "Baby",  setup() {    const { state, send } = useMachine(babyMachine);    return {      state,      send,    };  },}
Now, we have the current state of the machine (state) and the mechanism to send events to our machine (send) made available to our Vue component.
I curated some baby pictures to represent each state and designed a Colby themed tamagotchi for the purpose.

I didn’t have enough time to wire up the buttons or tidy up the styling but I added some buttons below to trigger every possible event.

We also used the mounted lifecycle method to set some timeouts to cause some of the events to happen at random.
mounted() { setTimeout(() => { console.log("Sending a yawn event"); this.send("YAWN"); }, 10000); setTimeout(() => { console.log("Sending a loud noise"); this.send("LOUDNOISE"); }, 10000 * Math.random()); },What’s next?
This was a lot of fun to build and we had a lot of fun on the stream. If you want to watch us build this you can rewatch the stream here, you can explore the code here and you can jump in and play with the tamagotchi here.
If you’re not signed up to my newsletter, you can do that below. I am passionate about helping developers learn, think about their learning process and, of course, sharing cool things I find on the web.
Your next read?


