Create a data driven component with WordPress and Next.js
Planted April 21, 2021
When you are building a content driven website for a client there is a tension between consistency of experience and the opportunity for flair.
If, like me, you are mostly working in a headless way, you may also want your CMS to capture and serve raw data at particular points. This can be processed and handled in your front-end framework of choice.
When we build front-ends, we tend to talk about component driven architecture. This post will look at building one such component from the backend through to the front.
I’m going to build one of the FrontPanel components from my website. It looks like this:
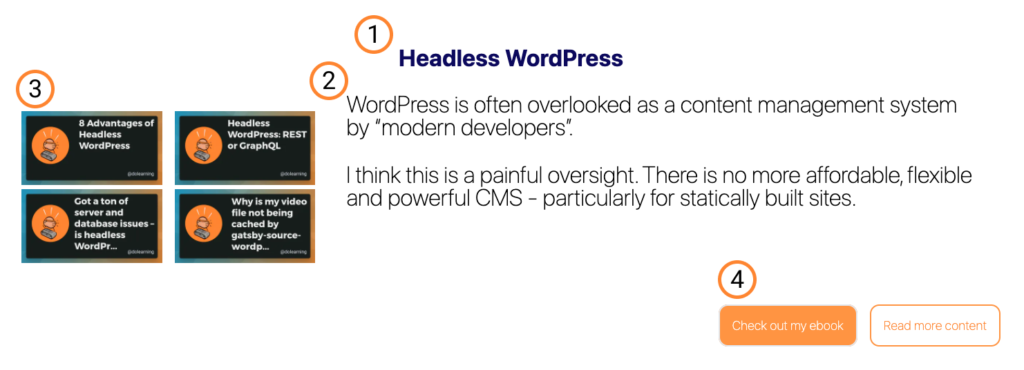
Labelled version of the FrontPanel component
Looking at the component, I want to break down the data that I need to be able to generate it most efficiently.
- The title
- Some description text
- Four links to relevant posts
- Two buttons linking to further content
Now that I know what I’m going to build, I need to be able to capture and query the data. To do this I’m going to use the Advanced Custom Fields plugin for WordPress. This allows us to add fields to specific locations to capture the data we need.
If you are using the free plugin, you gain a lot of excellent functionality. The ACF Pro upgrade adds some really useful field types that I use a lot in client work and find hard to live without. For me, the highlights are Repeater Fields, Flexible Content fields and the Options pages. But this isn’t an advertisement for ACF! For this post, I’ll use the free plugin. Note that on the home page of this website I use this same strategy with a Flexible Content field which lets me mix and match this component with other components.
Creating Custom Fields with ACF
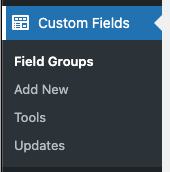
Once you have installed and activated the ACF plugin, you’ll have a new sidebar item in your WordPress admin panel.
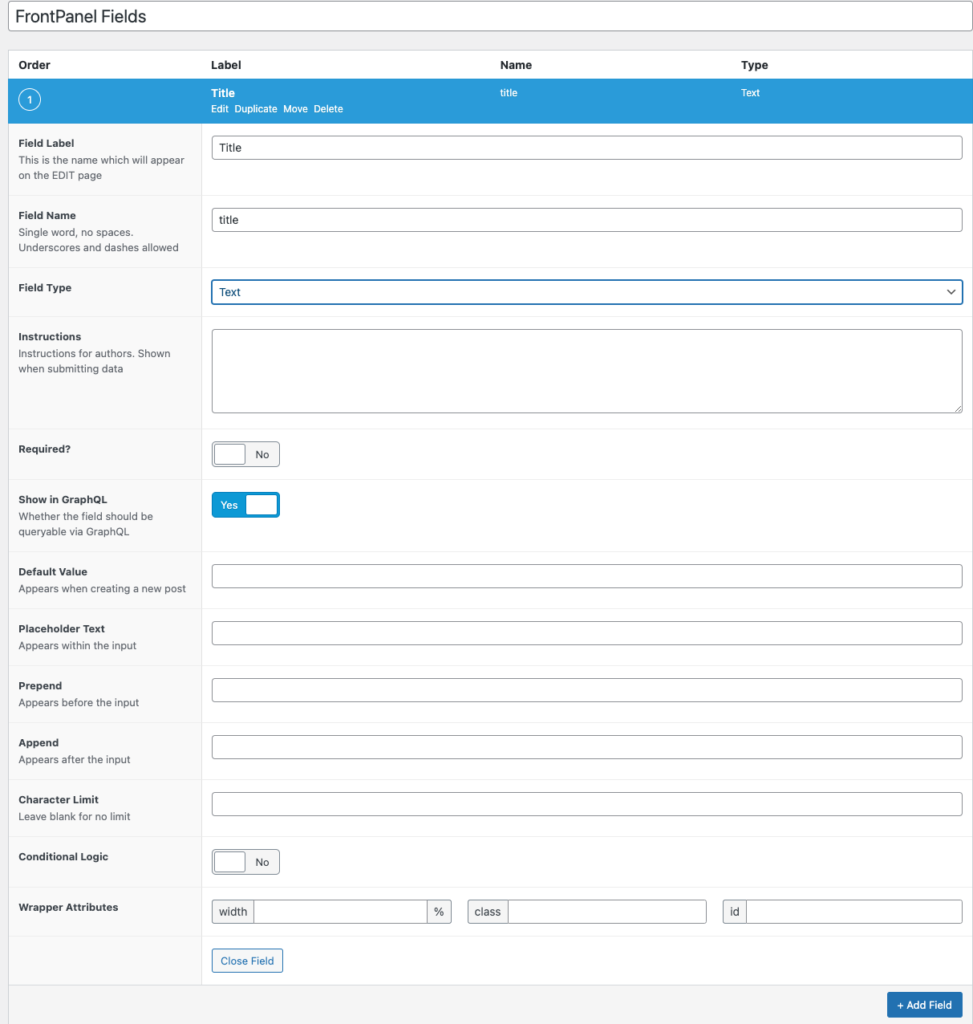
Clicking on “Add New” will let you start filling out the fields for the component. There are a lot of possible options here but for the first two fields, we’re only going to fill in the label, name and type.
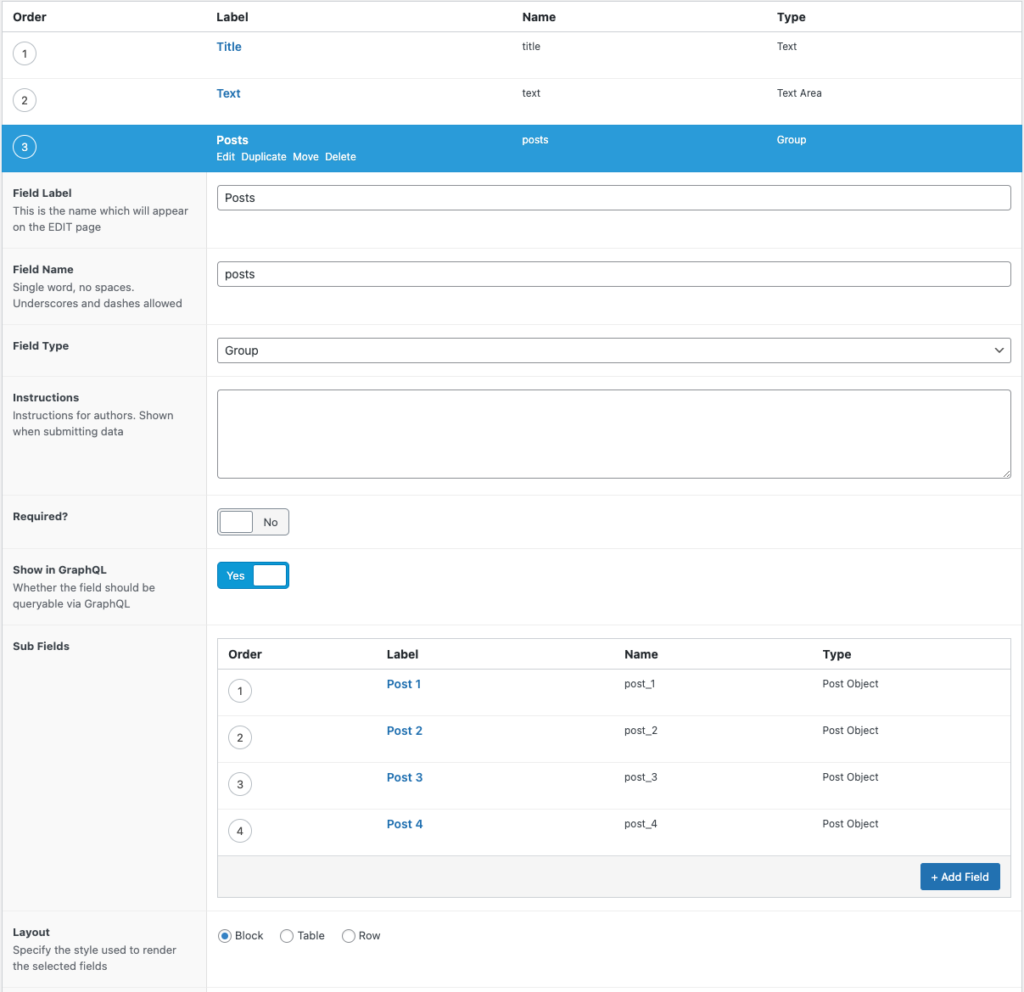
The third section of data we wanted was a link to relevant posts. With ACF Pro, I would set this up as a repeater field which would allow me to vary the number of posts. For now, I’ll use a group field type and have four fields to capture the relevant posts. Each of the fields in the group will be of type Post Object. It should look a bit like this:
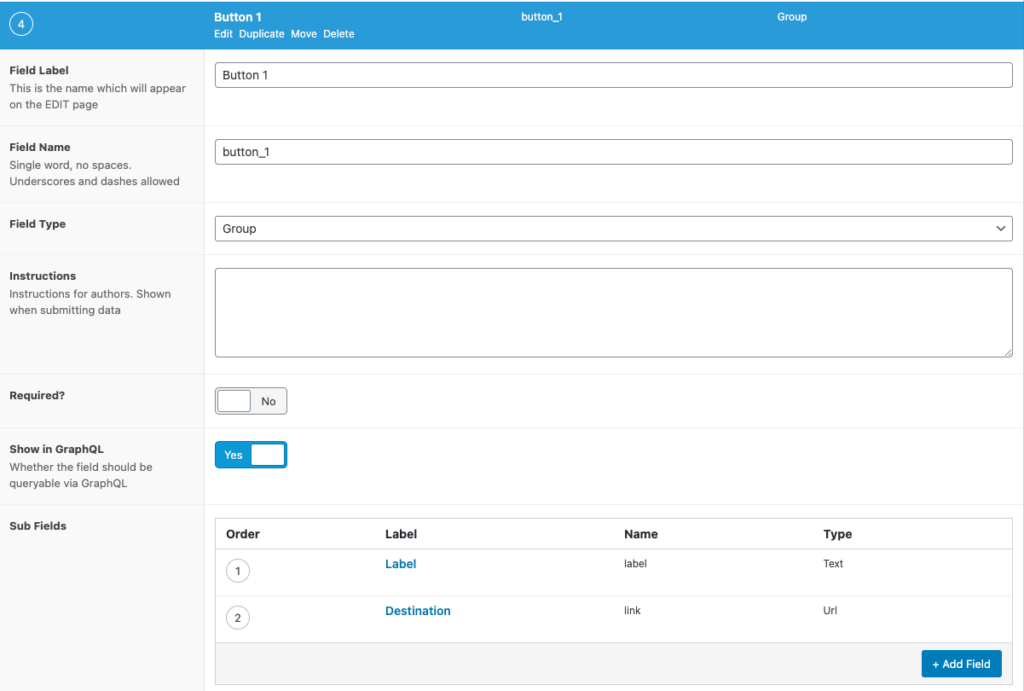
The final fields we need to capture are those for the two buttons. Let’s create a group for each button which will have a label and a destination.
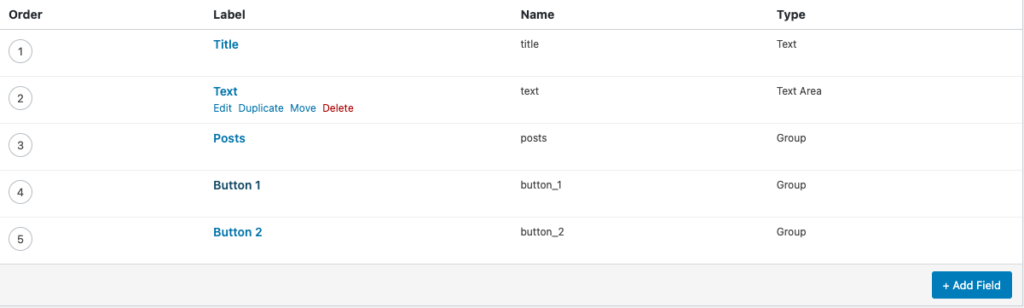
All done! Our final set of fields should look like this:
Making the fields available
We have control over where and how these fields are displayed in our admin area. I want these panels to be available on any page. So, below the field definitions I will set that location rules.

You can be even more granular and have these fields available on a particular page or post. Building up an interface with ACF runs the risk of overcomplicating your editors’ experience. Make sure you only make the fields available where they absolutely have to be.
Among the options we didn’t look when defining our fields were those around layout. This gives you great control over the position and sizing of the fields in the WordPress admin interface. There is a lot of scope to make this work well for you and your content creation team.
Create a page with our component
At the moment, we are adding the ACF component to an existing post type. That means we will see the Gutenberg editor and the fields for our component.
It is possible to have our ACF fields encapsulated by a Gutenberg block but there are a few reasons we’re not looking at that in this post.
- It requires ACF Pro and I wanted to write this from the perspective of the free plugin
- The support for Gutenberg blocks in GraphQL isn’t really there yet.
For now, I’ll add the some content and fill in the fields for our component.
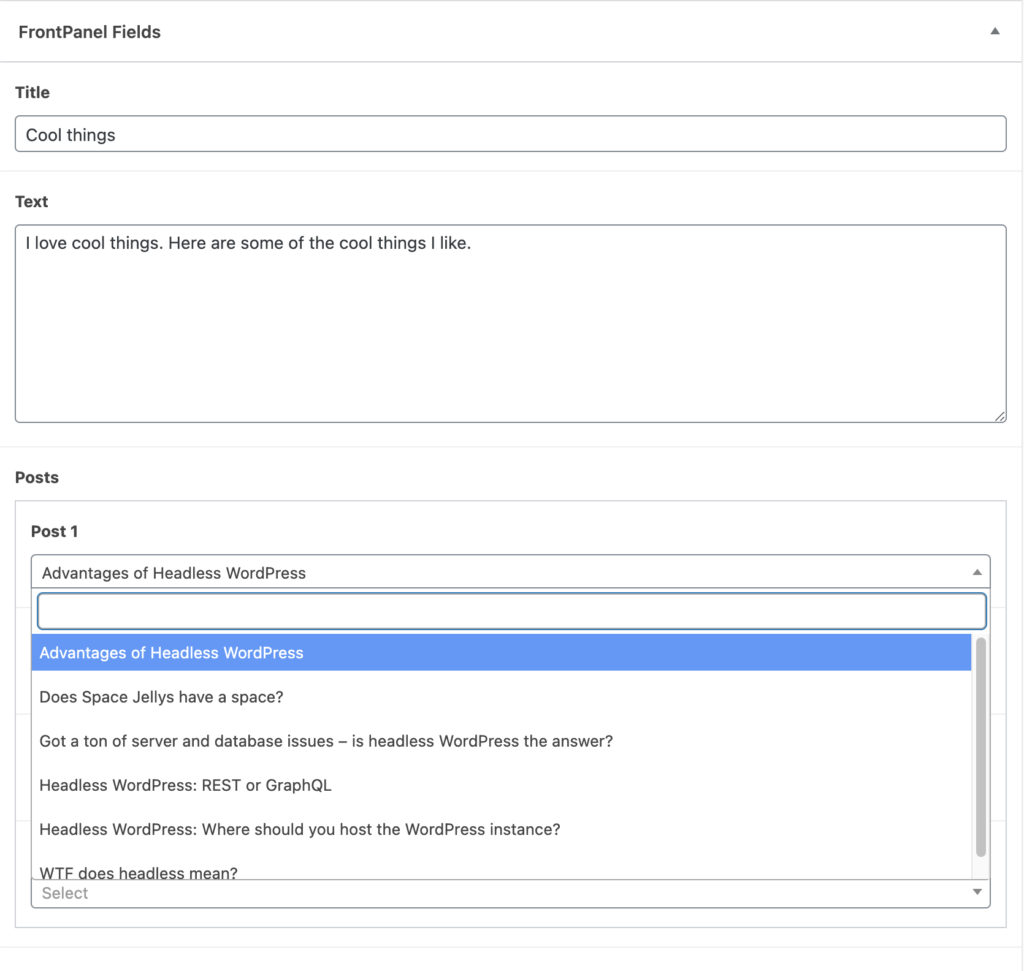
When we select a post, get a drop down of all the posts on our WordPress instance to select from. I’ll select the posts I want (which in this sample instance are all about Headless WordPress) and finally fill in the details for my buttons.

Preparing the GraphQL Query
There are two plugins that need to be added to our WordPress instance. WPGraphQL is an amazing plugin built by Jason Bahl and other contributors. It is available on the WordPress plugin directory.
In order to make ACF fields available to GraphQL there is a second plugin we need. It’s called WPGraphQL for Advanced Custom Fields. This isn’t yet in the plugin directory but can be downloaded and installed from the website here.
Once installed, we need to nip back to our Custom Fields to do a final piece of configuration.
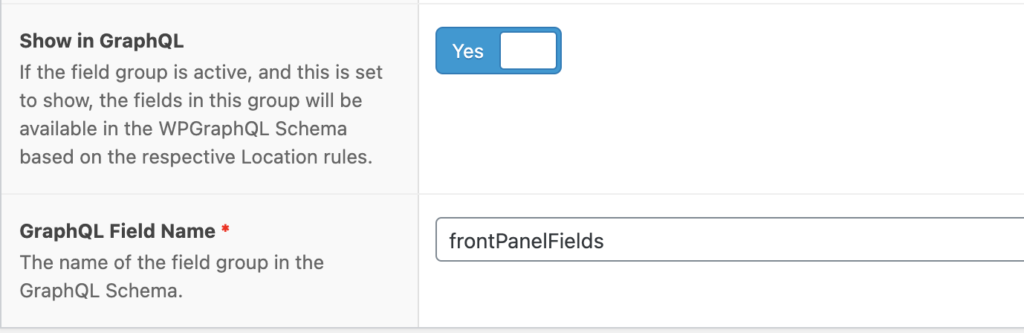
At the bottom of our field block, we now have the option to show these fields in GraphQL and to give them a name. This is how we’ll refer to them in our GraphQL query.
Let’s head to the GraphiQL interface to build out our query before we head over to Next.js to implement this feature.
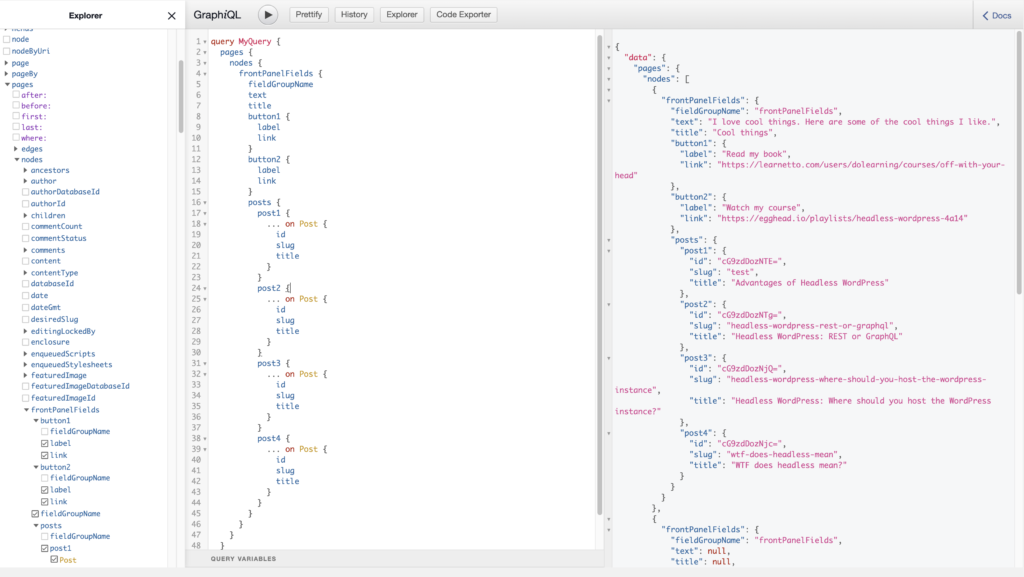
The awesome thing about GraphQL is that we request the exact data we need. Here I am requesting all the page nodes and specifically the FrontPanel fields. I’ll include the code block as well in case you want to copy and paste.
query MyQuery { pages { nodes { frontPanelFields { fieldGroupName text title button1 { label link } button2 { label link } posts { post1 { ... on Post { id slug title } } post2 { ... on Post { id slug title } } post3 { ... on Post { id slug title } } post4 { ... on Post { id slug title } } } } } }}Getting the data into Next.js
If you haven’t got started with Next.js and WordPress, I’d highly recommend my friend Colby Fayock’s Next starter. I find the way that Colby has structured the queries and functions to be really helpful. When I’m adding new functionality, I use that as a model. My one gripe is that it doesn’t use Tailwind which is my styling framework of choice (I’ve started a fork to have all of Colby’s epic functionality with Tailwind styling and hope to have it finished soon).
I’m going to assume that you are using some kind of WordPress/Next.js starter or have Apollo up and running in your Next app. We’ll need to use the query we constructed above and use it in the right place.
Following on with Colby’s example, I added a new query function to /data/pages.js.
export function getQueryFrontPanelById(id) { return gql`query { page(id: "${id}") { frontPanelFields { fieldGroupName text title button1 { label link } button2 { label link } posts { post1 { ... on Post { id slug title } } post2 { ... on Post { id slug title } } post3 { ... on Post { id slug title } } post4 { ... on Post { id slug title } } } } } } `}This is exactly the same as before, except I’m using the id of the page to get the correct data. Pages are hierarchical in WordPress and so we can’t search by slug, rather we need to get the id and use that to find the correct page.
That’s what I do over in /lib/pages.js:
export async function getContentAndFields(slug) {  // Get all of the WordPress pages  const { pages } = await getAllPages()
  // Find one that has a matching slug  const filteredPages = pages.filter(page => page.slug === slug)
  // If we don't find one, return null  if (filteredPages.length === 0) {    return null  }
  // Otherwise, get the first one  const page = filteredPages[0]
  // Get the Front Panel info  const { frontPanelFields } = await getFrontPanelById(page.id)
  // and return all the data.  return { ...page, frontPanelFields }}
There is a lot going on there but hopefully the comments make it clear.
Now, I’m going to create [slug].js file in the pages directory which I’ll use to access my page with Front Panels. Here is what my version of the page looks like. Again, I’ll annotate with comments. It’ll make more sense if you start at the bottom and look at the getServerSideProps function and then start at the top again.
import Layout from "components/Layout"import FrontPanelComponent from "components/FrontPanelComponent"import { getContentAndFields } from "lib/pages"
import Error from "next/error"
export default function PageWithAcfComponents({ pageData }) {  // If there is no pageData, then the page didn't exist so serve a 404 error.  if (!pageData) {    return <Error statusCode={404} />  }
  // Destructure the content and panel data from the page data.  const { content, frontPanelFields } = pageData;
  return <Layout>    <div className="mx-auto px-4 sm:px-6 lg:px-8 py-8 blog-post max-w-2xl">      // If there is frontPanelFields, render the component.      {frontPanelFields && <FrontPanelComponent data={frontPanelFields} />}      // Render the other content to the DOM.      <div        className=""        dangerouslySetInnerHTML={{          __html: content,        }}      />    </div>  </Layout>}

export async function getServerSideProps({ params = {} } = {}) {  // Get the slug from the request route.  const slug = params?.slug;  // Get the fields and content using the function we defined earlier  const pageData = await getContentAndFields(slug)  // Return the pageData to the component above.  return {    props: {      pageData    }  }}
Phew! This is a lot of code. We’re almost there. The last thing we have to do is build the FrontPanelComponent.
Here’s the code for that:
import Link from "next/link";import Image from "next/image";import { getMetaImage } from "lib/image";
export default function FrontPanelComponent({ data: { title, text, button1, button2, posts, ...rest } }) {  return <div className="bg-white p-4 py-20">    <h2 className="text-center font-bold text-dlblue text-3xl">{title}</h2>    <div className="flex flex-col md:flex-row justify-between">      <div>{mapPosts(posts)}</div>      <div className="text-xl text-black leading-none px-8 xl:text-2xl lg:text-xl -pt-4">        <div>{text}</div>      </div>    </div>    <div      className="flex md:flex-row flex-wrap md:justify-end mt-8"    >      <div className="text-normal lg:text-xl mx-2">        <a className="text-white rounded-xl p-4 text-primary hover:bg-primary hover:text-white border-2 border-primary bg-white" href={button1.link} target="_blank">          {button1.label}        </a>      </div>      <div className="text-normal md:text-xl mx-2">        <a className="hover:text-lightPrimary hover:bg-white border-2  hover:border-primary text-white bg-lightPrimary rounded-xl p-4" href={button2.link} target="_blank">          {button2.label}        </a>      </div>    </div>  </div>}
function mapPosts(posts) {  const { post1, post2, post3, post4 } = posts;  return <div className="pt-8 grid grid-rows-2 grid-cols-2">
    <div className="mx-2">      <Link href={`/posts/${post1.slug}`}>        <a>          <Image src={getMetaImage(post1.title)} width="380" height="200" />        </a>      </Link>    </div>    <div className="mx-2">      <Link href={`/posts/${post2.slug}`}>        <a>          <Image src={getMetaImage(post2.title)} width="380" height="200" />        </a>      </Link>    </div>    <div className="mx-2">      <Link href={`/posts/${post3.slug}`}>        <a>          <Image src={getMetaImage(post3.title)} width="380" height="200" />        </a>      </Link>    </div>    <div className="mx-2">      <Link href={`/posts/${post4.slug}`}>        <a>          <Image src={getMetaImage(post4.title)} width="380" height="200" />        </a>      </Link>    </div>
  </div>}
Mostly, this is rendering and styling the data. I use Tailwind for my styling so, if that might look a bit strange if you don’t know it. It explains why I have such odd sounding class names!
There are three distinct things I’d like to draw attention to in this code block:
- I’m using the Next Link component. This tells Next that I am referencing a link internal to the application and handles pre-fetching and non-refreshing page changes.
- I’m also using Next Image component. This handles image optimization and lazy loading. It works like a normal image tag but you have to provide the dimensions of the final image.
- I’m using a function called
getMetaImage. This function constructs a Cloudinary link that overlays the title of the post on a base image I use for all my posts.
And we’re there…
There is a lot of code in this post, well done for sticking with it to this point. You can see the final product of the FrontPanels on my homepage (https://kevincunningham.co.uk).
As I’ve used the free ACF plugin, I haven’t been able to deal with repeater fields or flexible content. That’ll be another post. For now, you can see the flow of creating fields, populating them, exposing them to graphQL and then creating the components on the front end.
I hope this has been useful. Sign up to my newsletter if you want to be notified about more posts like this one.


